User Management
If you click on the username of a specific user from the Users listing page, you will be able to edit the account of that user.
On the Edit user page, the admin can manage the following items:

1. Click here to go back to users listing page.
2. Click here to log into the website as this user – a new window will open and you will land into Dashboard area of the selected user.
3. Click here to see the channels that this user has.
4. Click here to see the IPs from which the user was logged in.
5. Click here to see the videos that this user has into the account – the recorded, uploaded and encoded videos will be listed. You will be redirected to Videos listing page.
6. Click here to view the DVR files that the user has on his account.
7. Click here to view the support tickets that the user has on his account.
8. Click here to create a new support ticket for this user.
Edit The Account Settings
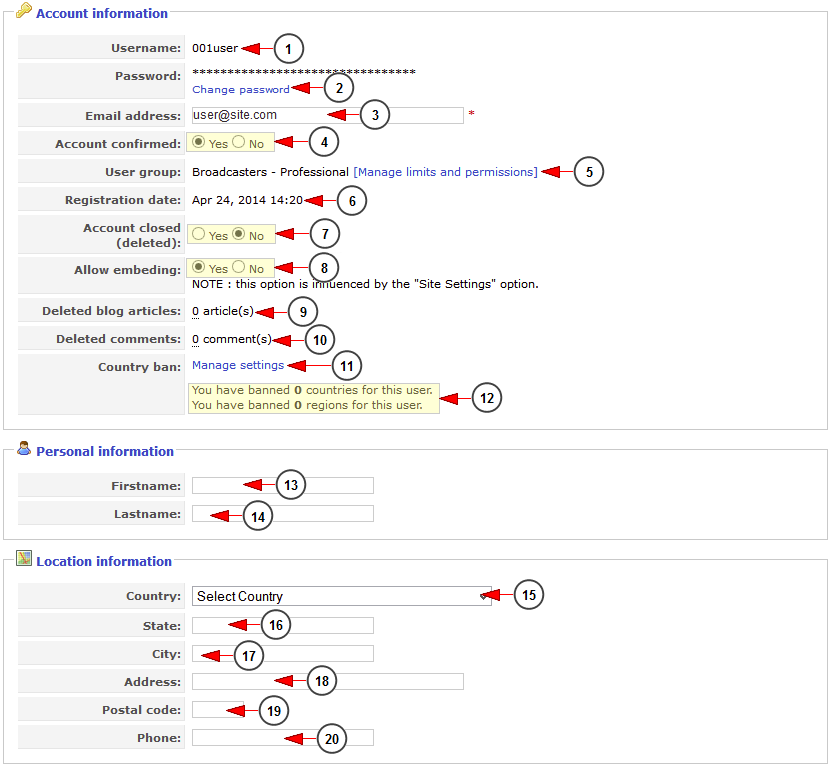
1. Here you can see the username of this user.
2. Click here to change the password of this user. The following fields will appear, where you will need to enter the new password twice:
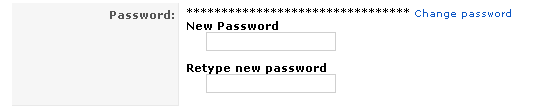
Note: If you will change the password of the user and the user is logged into his account, the user will be logged out of his account and asked to login using the new password.
3. Here is the email address of this user and you can modify it.
4. Check the Yes radio button to confirm account and the No radio button if you don’t want to confirm account.
5. Here you can see the user’s group – click on the link to manage the user’s limits and permissions; edit or upgrade user’s package details.
6. Here you can see the date when the user registered into the system.
7. From here you can delete the user account – please note that the account will be removed and it can’t be restored.
Important: Once an account is deleted from the Streaming platform platform, the account is not removed from the Database, since there may be transactions related to it and this will affect the reports. The user will be notified that his account was closed, when trying to log into his account.
8. Check the Yes radio button to allow the user to embed the player into other sites, or the No radio button if you don’t want to allow the user to embed the player into other sites.
9. Here you can see how many blog articles created by this user were deleted by admin.
10. Here you can see how many comments posted by this user were deleted by admin.
11. Click here to manage the Country ban settings.
12. Here you can view the number of regions and countries user has banned.
13. Here is listed the user’s first name and you can edit it.
14. Here is the user’s last name and you can edit it.
15. Here you can see and edit the country for this user.
16. Here you can see and edit the state where this user lives.
17. Here you can see and edit the city where this user lives.
18. Here you can see and edit the address where this user lives.
19. Here you can see and edit the postal code of the user’s city.
20. Here you can see and edit the user’s phone number.
CDN and Live DVR Settings
You can select if you want to allow the videos of a specific user to be published through CDN by default or if you want to enable Live DVR on user’s channels:

1. From here you can select if you want to have all the videos owned by this user playing through the CDN by default
Notes:
• CDN must be setup before enabling this option – please contact us for more details.
• Be aware that the user will make traffic through CDN.
Subscribed Content
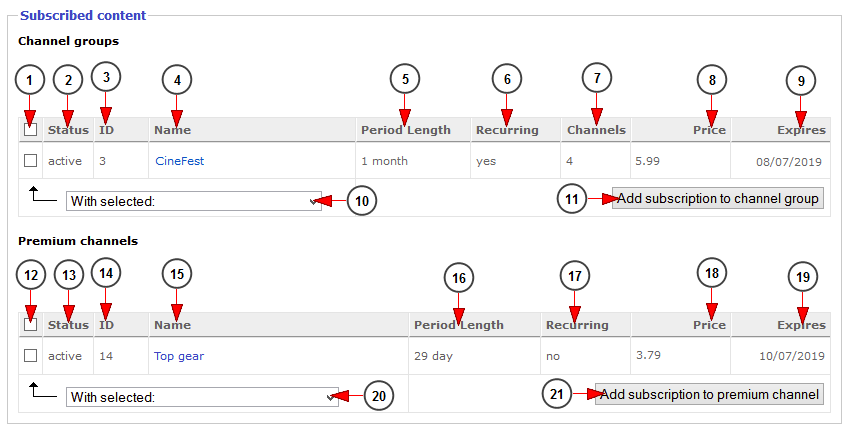
1. Click here to select the group channel subscriptions in order to remove the user’s subscription.
2. Here you can view the status of the subscription.
3. Here you can see the ID of the subscription.
4. Here you can see the group channel name – by clicking on it you can edit the channel group details.
5. Here you can see the period length of the subscription.
6. Here you can see if the subscription is recurring or not.
7. Here you can see the number of channels of the group.
8. Here you can see the price of the subscription.
9. Here you can see the expiration date of the subscription.
10. Click on the drop down list to remove subscription from the selected channel groups.
11. Click here to add a new subscription to a channel group.
Note: Only one channel group subscription can be made.
12. Click here to select the premium channels you plan to remove the user’s subscription.
Note: All transactions made through PayPal or Authorize.net do not have a check box in order to prevent the administrator from accidentally removing or deleting them. In this case, the user will continue to pay a monthly fee, but will not have access to a channel or a channel group. Only the free subscriptions, made by the administrator have a check box and can be removed.
13. Here you can view the status of the subscription.
14. Here you can see the ID of the subscription.
15. Here you can see the premium channel name – by clicking on it you can edit the channel details.
16. Here you can see the period length of the subscription.
17. Here you can see if the subscription is recurring or not.
18. Here you can see the price of the subscription.
19. Here you can see the expiration date of the subscription.
20. Click on the drop down list to remove subscription from the selected premium channels.
21. Click here to add a new subscription to a premium channel. You can subscribe to as many premium channels as you want.
Note: When the subscriptions end or expire, the subscribed channel or group channel will disappear (will not be displayed anymore) in the Subscribed Content list.
User's Devices
On User’s devices area, the website administrator can view and manage the devices that are waiting to be activated on user account and also the admin can manage the devices that the user activated on his account:
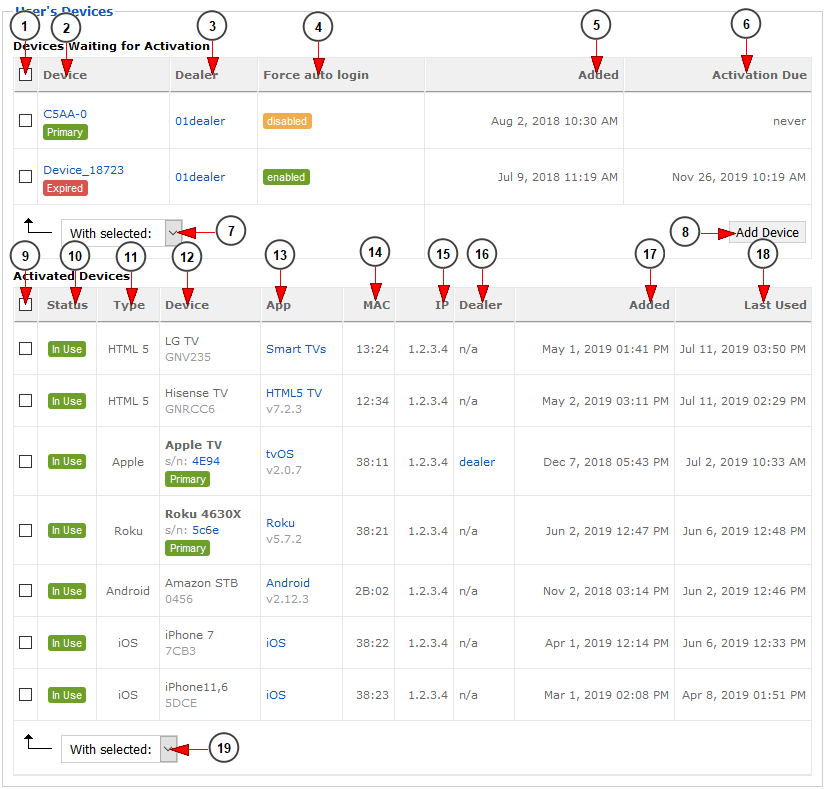
1. Check this box for the corresponding device that you want to remove from user’s account.
2. Here you can view the device serial number, the type of the device (Primary) and if the device is Waiting for activation or Expired.
3. Here you can view the dealer that added the device on the platform.
4. Here you can view if the auto login is forced on the device.
5. Here you can view the date when the device was added on the platform.
6. Here you can view the date until which the user should activate the device on his account.
7. Select from the drop-down the option to remove the device from user’s account.
8. Click here to add a new device on user’s account.
Once you selected to add a new device an overlay window will appear and you can select the serial number of the device that you want to assign to this user:
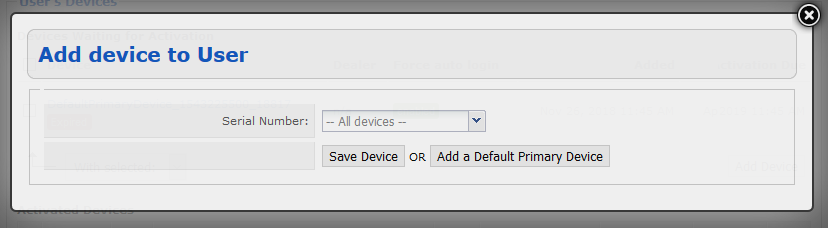
You also have the option to assign a default device to this user. This is used when you want to use a test account and to allow him to access the premium content.
9. Check this box for the corresponding device that you want to remove from user’s account.
10. Here you can view the status of the device: In Use. Not In Use.
11. Here you can view the type of the device: HTML5, Apple, Roku, Android, iOS.
12. Here you can view the name and serial number of the device.
13. Here you can view the application that is running on the device.
14. Here you can view the MAC address of the device.
15. Here you can view the IP address of the device.
16. Here you can view the dealer that added the device on the platform.
17. Here you can view the date when the device was added on the platform.
18. Here you can view the date when the device was used last time.
19. Select from the drop-down the option to remove the device from user’s account.
Devices Limit
On the Devices limit area you can set the limit of the devices that a specific user can activate and use simultaneously on his account:

1. Here you can view and edit the limit of devices that user has on his account.
2. Click here if you want to reset the custom limit of devices that user has on his account.
3. Here you can view the number of devices that user activated on his account.
4. Here you can view the number of devices that user has left to activate on his account.
PPV Settings
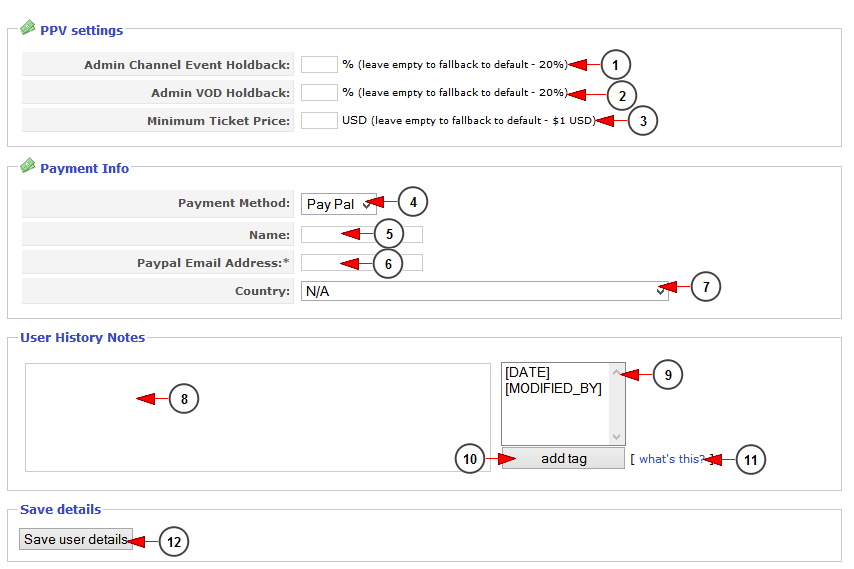
1. Type in the box the percentage you want for the admin channel event holdback.
2. Type in the box the percentage you want for the admin VOD holdback.
3. Type in the box the minimum ticket price.
4. Select from the drop-down menu the payment method. At the moment all payments made to users can be done through PayPal.
5. Here you can view and edit the user’s name.
6. Here you can view and edit the PayPal email address.
7. Here you can view and edit the user’s country.
8. Here you can see the user history notes. This is used so the administrators will know what modifications were made on the user profile.
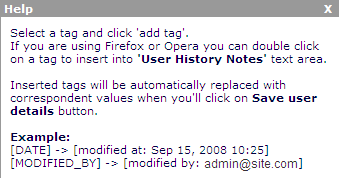
9. Here are the tags that the admin can add on User History Notes. The [DATE] tag will be replaced with the day, year and hour when the admin modified the profile; the [MODIFIED_BY] tag will be replaced with the name of the admin that made the modification.
10. Click here to insert the selected tag.
11. Click here to see the help for the tags – the following pop-up image will appear:
User's Channels
If you click on the User’s Channels tab, you will be able to see the channels that user has:
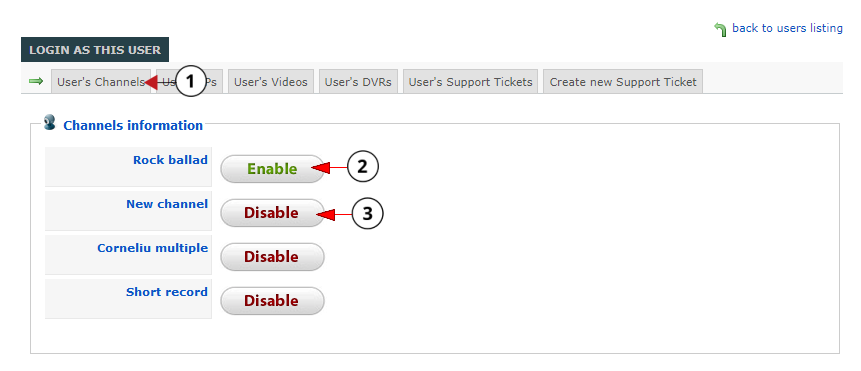
1. Click here to view the user’s available channels.
2. Click on this button to enable the channel.
3. Click here to disable user’s channel.
Notes:
• If the button text is Enable, then the channel is disabled.
• If the button text is Disable, then the channel is enabled.
User's IP's
If you click on the User’s IP’s tab, you will be able to see the IP’s from where the user connected to the website:
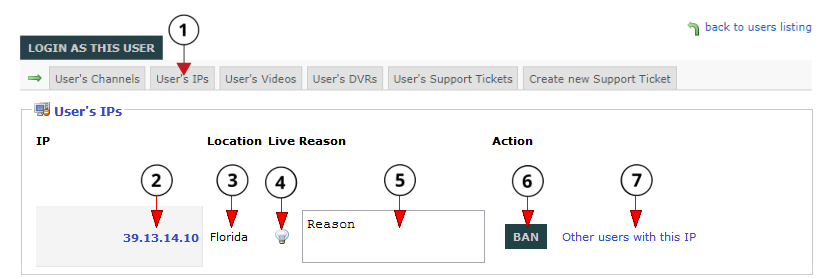
1. Click here to view the User’s IPs page.
2. Here you can see the IPS from where the user has logged into his account.
3. Here you can see the location of the IP.
4. Here you can see if the user is connected from this IP in that moment.
5. Enter here the reason why you want to ban this IP.
6. Click here to ban that IP.
7. Click on the link to view a list of the users that connected from the same IP.
User's DVR's
If you click on the User’s DVR’s tab, you will be able to see the DVR’s that the user recorded and scheduled to be recorded on the website:
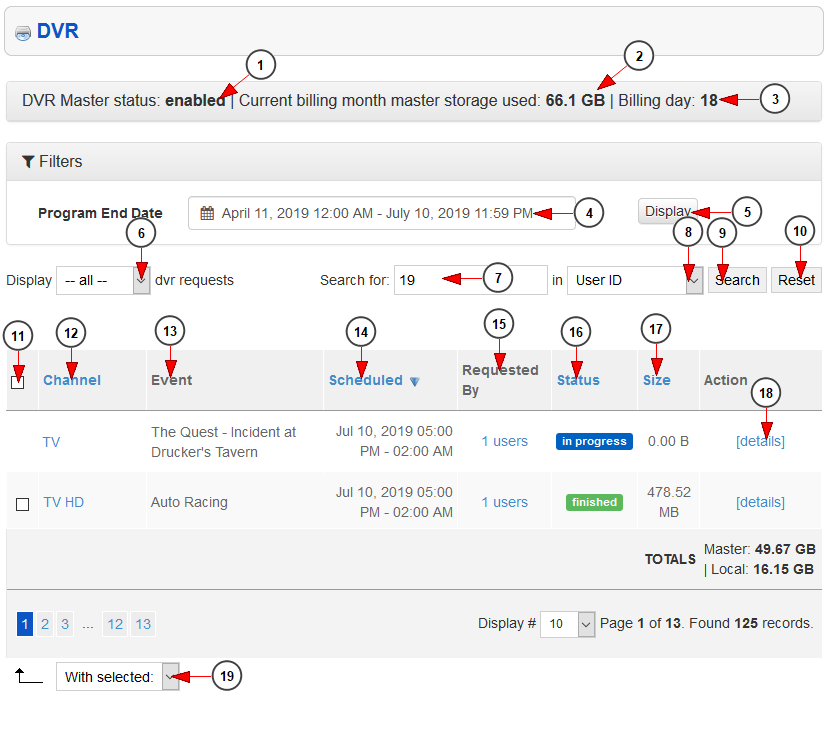
1. Here you can view the status of the DVR Master module.
2. Here you can see the master storage used for the current billing month.
3. Here you can see the day when the billing for Master Storage is done and the counter reset.
4. Click here to select the start and end date for the filter that you want to use on the user’s DVR list.
5. Click here to apply the filer and display the DVRs for the selected interval.
6. Select from the drop-down menu the type of DVR requests that you want to list: pending, recording, finished, failed, deleted.
7. Here you can view the ID of the user for which the list of DVRs is displayed.
8. Select from the drop-down where you want to search: Channel’s name, Event’s name, User IS ; by default the option is selected to User ID as you are viewing the user’s DVRs.
9. Click here to perform the search on the DVR list.
10. Click here to reset the search filters.
11. Check this box if you want to delete the DVR.
12. Here you can view the title of the channel.
13. Here you can view the title of the event that was running on the channel.
14. Here you can view the time interval when the event was scheduled.
15. Here you can view how many users requested the DVR to be recorded.
16. Here you can view the status of the DVR: in progress, finished, pending, failed, deleted.
17. Here you can view the size of the DVR – the amount that the video occupy on the server.
18. Click here to view more details on the DVR.
19. Select form the drop-down menu the option to delete the DVR file.